Luxury Vinyl Tile Flooring
Luxury Vinyl Tile Flooring
Installation Guidelines


Acclimatisation of Material Before Installation
Remove material from packaging, spread out and allow to condition in the room where the installation is to take place at a constant temperature of 18°-26°C for a period of 24 hours prior to installation. A constant temperature should be maintained during installation, and for a 24 hour period after installation (Tiles and planks must be stored flat).
Sub-floors
Products must only be laid on sub-floors where the moisture level does not exceed 75%RH when tested with a hygrometer in accordance with BS8203-4; 2001 (Installation of resilient floor coverings). Where readings above 75%RH are recorded it would be necessary to install a surface DPM (damp proof membrane), this applies to both new and old floors.
Concrete/Sand Cement Screeds (New)
For new concrete floors below 75%RH i.e. dry. Clean the floor to remove contamination (laitance, paint, plaster, etc.) prime the floor and then apply a compatible smoothing compound to a minimum of 3mm. For readings above 75%RH consult your supplier for information relating to surface DPM requirements.
Power Floated Concrete
If readings with the hygrometer are below 75%RH the power floated floors require abrasion prior to the application of a primer and compatible smoothing compound to a minimum of 3mm. (Abrasion can be either scarification or light shot blasting). For readings above 75%RH the surface will still require abrasion before applying a surface DPM.
Quarry Tile/Mosaic/Terrazzo/Ceramics
Test floor for evidence of damp. If after testing, dampness is apparent consult your supplier. Check floor area for unstable, loose or broken tiles. Remove loose pieces and fill deep holes with rapid drying mortar. Degrease, rinse and abrade the surface of the floor. Apply primer and compatible smoothing compound to a minimum of 3mm. A second topcoat of primer and smoothing compound may be required to nullify sinking of smoothing compound over old tile grout lines.
Asphalt
Asphalt should be de-greased and the surface rinsed with clear water. The surface should then be primed and a compatible smoothing compound applied to a minimum of 4mm.
Timber Floors
Standard Floorboards/Tongue and Groove Floorboards should be well secured, loose boards firmly fastened worn/broken boards replaced. Lay a minimum 6mm flooring grade plywood, fixes at maximum 150mm centers. Then apply a full coat of skim coat over the plywood. Undulating or Flexible Timber Floors Alternatively for undulating timber floors apply a primer over the plywood and a minimum 3mm coat of fibre reinforced smoothing compound.
All Chipboard/MDF/Weyrock
Overlay with a 6mm flooring grade plywood fixed at maximum 150mm centers and apply full coat of skim coat.
Wood Mosaic Panel, Woodblock, Wood Strip
Remove any of these products if laid direct to earth/bitumen/pitch, these should not be overlaid with an impervious vinyl. If laid onto a wood floor check to ensure all flooring is securely fitted then treat as timber floors.
Flooring Grade Plywood Floors
Apply full coat of skim coat to smooth joints and fixings in plywood. Alternatively apply primer and lay minimum 3mm coat of fibre reinforced smoothing compound. (Any plywood floors with thickness less than 6mm treat as chipboard).
Laminate
Existing laminate floor coverings must be uplifted and removed together with any underlay and laminate flooring accessories. The sub-floor should be treated as per the sub floor exposed.
Metal Floors
Consult your supplier
Painted Floors
Mechanically remove all paint back to original base prime and apply a compatible smoothing compound to a minimum of 3mm.
Cork
Uplift and remove adhesive residue. The floor should be treated as per the subfloor exposed.
Miscellaneous Floors
Including magnecite, granwood, anhydrite – consult your supplier.
Existing Floor Coverings (Linoleum, PVC, Thermoplastic)
Remove existing floor covering and all traces of adhesive residues. The subfloor should be treated as per the subfloor exposed.
Underfloor Heating (all types)
It is possible to install LVT over floors incorporating underfloor heating, but these must be insulated to ensure surface temperature does not exceed 27°C (80°F). The underfloor heating must be switched off 48 hours before, during, and 48 hours following the installation, then gradually increase to working temperature. High Temperature (HT) or epoxy adhesive must be used.
›› Electrical Underfloor Heating (extra information) Consult under floor heating manufacturer and make sure the system is compatible with LVT Flooring. Mesh/ Wire systems must be bedded into a base coat of reinforced fibre smoothing compound to cover the wires or mesh. Then a second coat of primer and reinforced fibre smoothing compound needs to be applied as a finish coat. This is applicable for both concrete and timber constructions sub floors. For underfloor heating pipes set into concrete, the surface must be primed before applying a compatible smoothing compound to a minimum of 3mm.
Epoxy Resin
This is a two-part mix. Both components should be mixed together with a drill and paddle to a smooth consistency and the contents poured out within 5 minutes of mixing time. If left within the container the resin will harden inside 15 minutes; on the floor you have up to 1 hour working time.
Recommended for areas subject to moisture and high temperature. Any areas under question consult your supplier. › NOTE Installer must wear eye protection and gloves when using this product.
High Temperature Adhesive (HT)
A modified acrylic adhesive with an improved service temperature. For use in areas subject to excessive heat and direct sunlight e.g. conservatories, shop windows, patio doors, external panelled doors and under floor heating. Dry fit floor in sections. Remove dry flooring including cuts. Apply High Temperature adhesive with an A2 trowel in smooth consistent sweeps. DO NOT leave puddles or streaks. Place flooring into wet adhesive. Apply hand roller over newly bonded floor. Wipe any excess adhesive off flooring immediately with a clean damp cloth. We always recommend that you work section by section, as product must be laid in wet adhesive. When using this adhesive the open time is approximately 15 minutes, depending on atmospheric conditions.
›› Special Note About Conservatories In areas that may be subject to extremely excessive direct heat 50°C or above (e.g. fully glazed south facing conservatories) the floor must be installed with epoxy adhesive. It is particularly necessary to keep the temperature in conservatories at a constant 18°-26° prior to, during, and for 24 hours after installation. It would also be advisable to shade windows to ensure that constant temperature conditions are maintained for 48 hours after installation.
Acrylic
Ideal for use in most normal residential and commercial installations. We always recommend that you work section by section, as product must be wet bonded when installed with this adhesive (the open time is approximately 15 minutes, depending on atmospheric conditions)
Pressure Sensitive Adhesive (PS)
Ideal for use in most residential and commercial installations. Best used as semi-dry/tack. Once adhesive has reached the semi-dry tack condition you will have approximately 2 hours working time. Use A2 trowel for all installations
Installation
Ensure that tiles and planks are laid into the adhesive within the prescribed open time indicated on the adhesive container. ALL products should be rolled after installation using a 68kg roller in larger areas, or a small hand roller in smaller areas. With the exception of products installed with pressure sensitive (PS) adhesive, which can receive traffic immediately following installation, ensure that all tiles and planks are free from general traffic for 24 hours after installation (or protect from direct contact for that period, i.e. board over).
HELP GUIDE
Take a look at our installation and advice video for the new Studio Click flooring system.
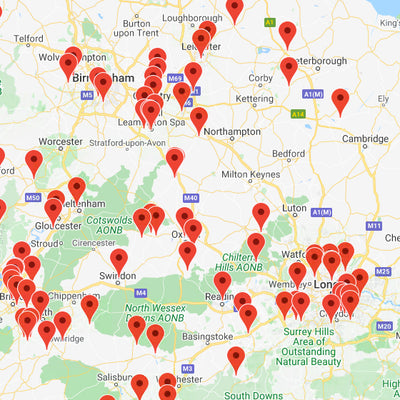
All of our approved retailers have wonderful showrooms for you to visit that feature Brampton Chase flooring collections. Each and every retailer has full expertise about our products and skilled installation teams.
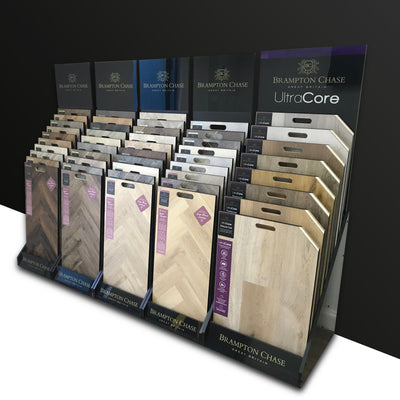
Retailers get unrivalled support from Brampton Chase. From crafted stands and innovative display solutions to marketing, technical and full sales support on hand to help you and your customers.

It's takes just a moment to complete, then relax on your new floor with complete peace of mind. Your warranty starts from the day you purchased your flooring, so please take a moment to complete our warranty registration form to activate the warranty on your brand new Brampton Chase flooring.
